
Reimbursements
Reimbursements can be filed for all reimbursable costs under the program.
To sign up for emails about the status of your Reimbursement Claim, see User Accounts and Notifications. Notifications for other users can only be managed by the Entity Administrator.
File a Reimbursement Claim Using the Application
Before filing a reimbursement claim using the application, we highly recommend signing up for email notifications about the status of your claim. This way you will get emails about that status of your claim, including when your claim has been accepted or rejected. When you add your reimbursement claim, select the add individual line items or add line items later option. Then add in your line items. Last, submit your reimbursement claim. This will look different depending on if you are an authorized signer or not. The specific steps are outlined below.
Search for a Reimbursement
In the navigation panel, select Reimbursements.
Type your search criteria into one or more of the fields. The list of reimbursements will filter based on your criteria.
Add a Reimbursement Claim
In the navigation panel, select Reimbursements.
Select + New to add a new reimbursement.

On the New Reimbursement Claim pop-up window:
Select the state program from the drop-down box.
Select the program year from the drop-down box.
Select the period for filing frequency from the drop-down box.
Choose a Claim Creation Option. You must choose add individual line items or add line items later.
Select Save.
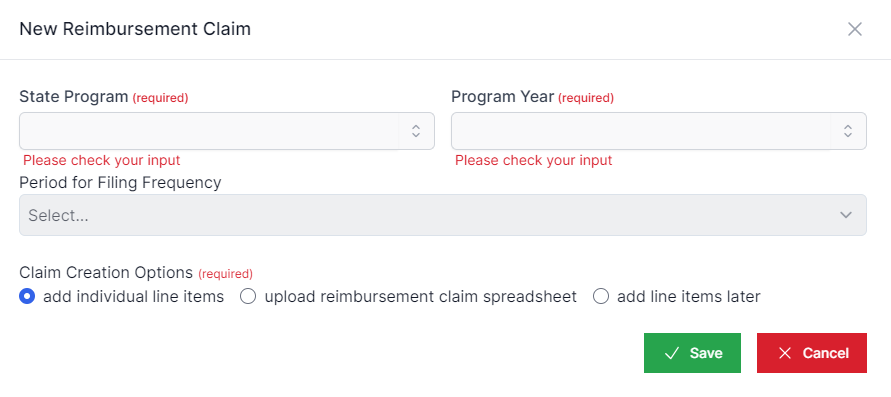
The title of your Reimbursement claim will be auto generated.
To add individual line items:
In the Add Reimbursement Claim Line Items pop-up window, select the boxes for the line items you want to include on your reimbursement claim.
Select Next to move on to the next category.
Continue to select Next until you have viewed and selected all items for your reimbursement claim.
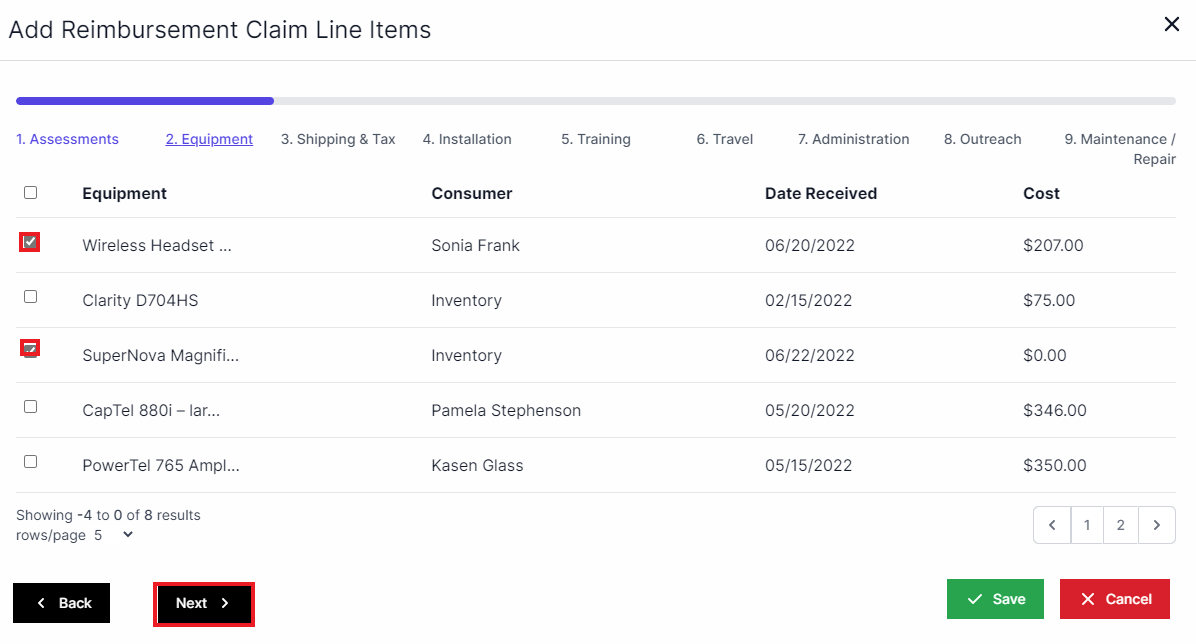
Select Save.
Line Item Status may be: Initiated, Submitted, Flagged, Returned to Entity, Linked Reimbursement Claim, or Removed Reimbursement Claim.
To add line items later:
Select View next to the reimbursement to which you want to add line items.

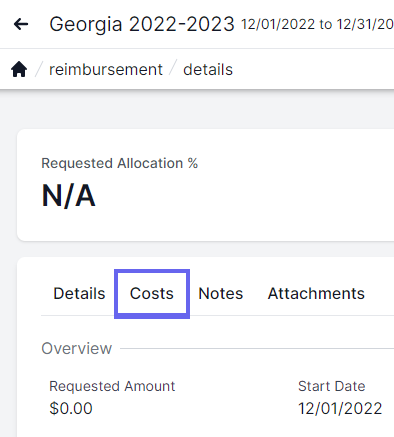
Navigate to the Costs tab.
Select +Add line items to add line items to your reimbursement.

For all three options, you must submit a reimbursement claim as your next step.
Submit a Reimbursement Claim if not an Authorized Signer
In the navigation panel, select Reimbursements.
Select the View icon (blue eye) next to the Reimbursement for which you want to submit a claim.
Navigate to the Costs tab.
Select Download. Your downloaded Reimbursement Claim appears in a pop-up window.

Print the download and fill in all fields.
Scan the downloaded document to your computer.
Select Submit. On the Submit Reimbursement Claim pop-up window:

Select Upload a file and choose the downloaded Reimbursement Claim you filled out and scanned.
Select Open. The name of your file appears in the Submit Reimbursement Claim pop-up window.
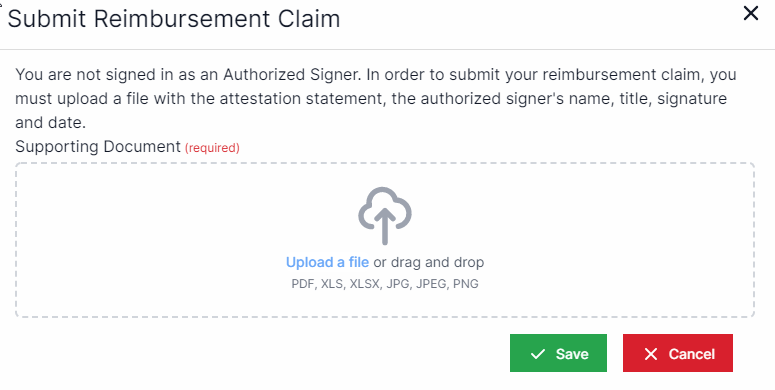
Select Save. You will then receive an email regarding the status of your reimbursement claim and if it has been accepted or if changes need to be made.
Submit a Reimbursement Claim as an Authorized Signer
In the navigation panel, select Reimbursements.
Select the View icon (blue eye) next to the Reimbursement for which you want to submit a claim.
Navigate to the Costs tab.
Select Submit. On the Submit Reimbursement Claim pop-up window:
Check the checkbox next to the paragraph.
Fill in your title in the Title text box.
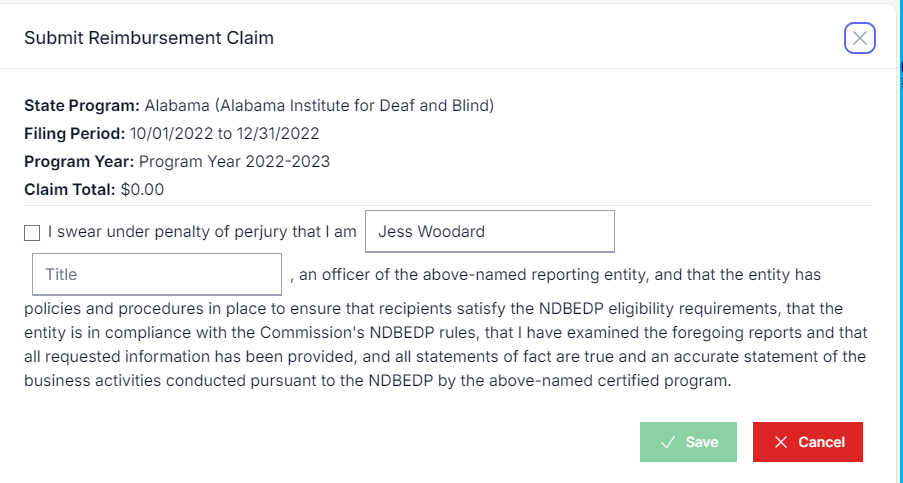
c. Select Save.
Once you submit your Reimbursement Claim, you will receive an email regarding its status. Reimbursement Claim statuses are: Initiated, Submitted, Revision, Rejected, Reviewed, Approved, Payment Requested, or Payment Completed.
Submit a Reimbursement Claim
In the navigation panel, select Reimbursements.
Select Submit (blue ticket icon) next to the reimbursement that you want to submit. The Submit Reimbursement Claim pop-up will appear.

If you are not an authorized signer:
Select Upload a file and choose a file to upload from your computer. Your file must include the attestation statement, the authorized signer’s name, title, signature, and date.
Select Open. The name of your file will appear in the Submit Reimbursement Claim pop-up.
Select Save.
If you are an authorized signer:
Check the checkbox next to the paragraph.
Enter your full name in the Full Name text box.
Enter your title in the Title text box.
Select Save.
Once you submit your Reimbursement Claim, you will receive an email regarding its status. Reimbursement Claim statuses are: Initiated, Submitted, Revision, Rejected, Reviewed, Approved, Payment Requested, or Payment Completed.
Modify a Reimbursement
Note: All modifications must be completed before submitting your Reimbursement Claim. You will not be able to modify a Reimbursement Claim once it has been submitted.
In the navigation panel, select Reimbursements.
Select View (blue eye icon) next to the reimbursement you want to modify.
Select the Costs tab.
Select + add line items to add additional line items to a reimbursement.

Select Unlink (red square) next to the line item you wish to remove to unlink a line item from a reimbursement.

6. Select yes at the pop-up.
7. Select Recalculate at the bottom of the costs screen to recalculate your total costs if you add or delete line items.

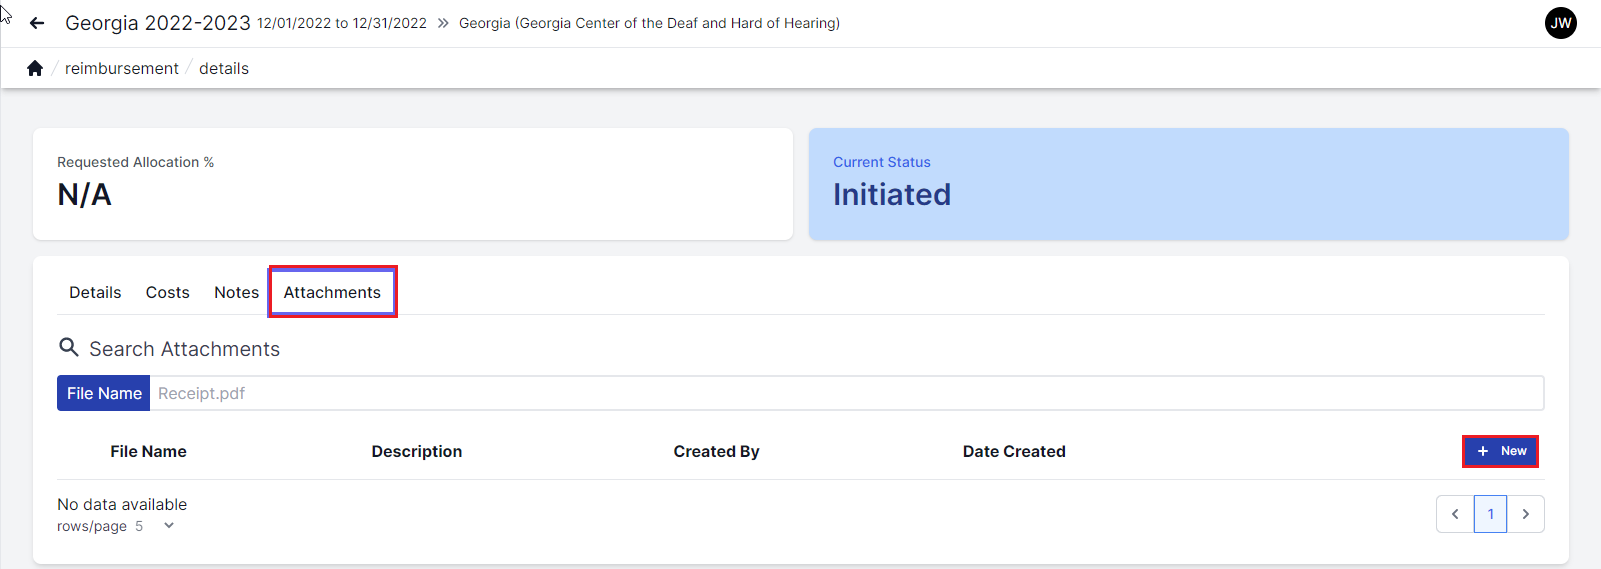
Add an Attachment to a Reimbursement
When an item has been submitted as part of a reimbursement claim, the attachments for costs are no longer visible but still may be downloaded from the submitted items for the reimbursement claim.
In the navigation panel, select Reimbursements.
Select View (blue eye icon) next to the reimbursement to which you want to add an attachment.
Select the Attachments tab.
Select + New.
In the Create Reimbursement Claim Attachment pop-up window, add a description for your attachment.
Select Upload a file.
Choose a file to upload from your computer and select Open. The name of the file will appear in the Create Reimbursement Claim Attachment pop-up window.
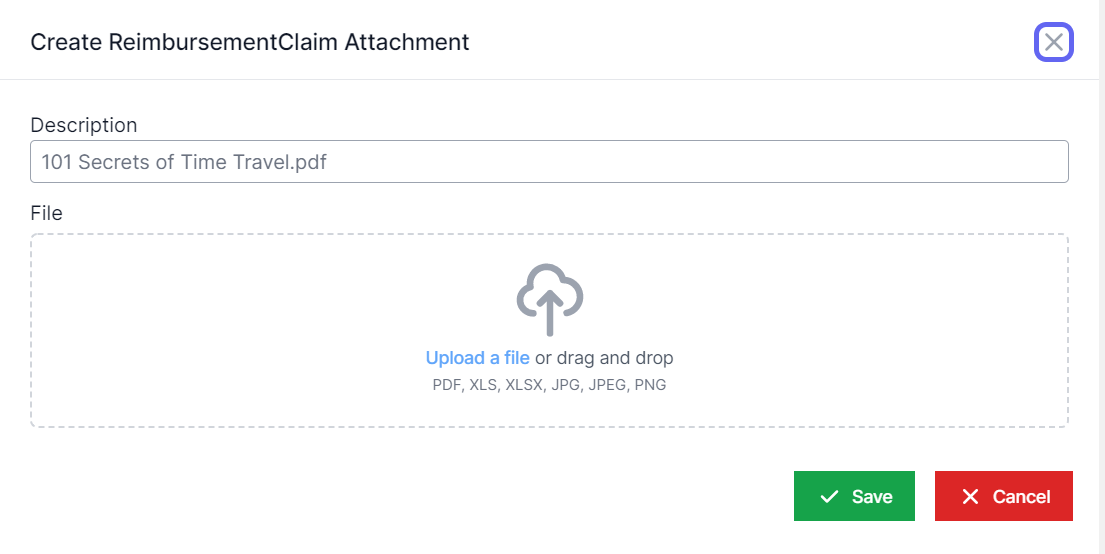
Select Save.
Resubmit a Reimbursement After Rejection
You will receive an email from Rolka Loube with details about why your claim was rejected. Carefully make these modifications to your claim. Then follow these steps:
In the navigation panel, select Reimbursements.
Select Submit (blue ticket icon) next to the reimbursement that you want to resubmit. The Submit Reimbursement Claim pop-up will appear.
If you are not an authorized signer:
Select Upload a file and choose a file to upload from your computer. Your file must include the attestation statement, the authorized signer’s name, title, signature, and date.
Select Open. The name of your file will appear in the Submit Reimbursement Claim pop-up.
Select Save.
If you are an authorized signer:
Check the checkbox next to the paragraph.
Enter your full name in the Full Name text box.
Enter your title in the Title text box.
Select Save.